Tuesday, December 12, 2023

Build JSON object in Power Automate

We often create custom JSON objects and pass them to an action or through a web request body. For instance, let’s consider a ‘Create item’ action. If we need to build properties, we can simply configure the JSON object in the ‘item’ section, as shown in the screenshot below.


The JSON object configured above works fine as long as the values don’t have any special characters that affect the JSON object structure. However, if the title variable contains a double quote (”), the flow would fail as the JSON structure would be disturbed.

A better alternative to fix the issue mentioned above is to use the ‘Select’ action and build the JSON object as shown in the image below. This action would take care of escaping all the special characters associated with JSON. Refer to below screenshot for building JSON with select action.


To use the object constructed in ‘Select’, refer to the 0th element from the body of the ‘Select’ output, as the ‘Select’ action would always have an array.


This approach is recommended only when JSON object values may contain special characters.


Friday, January 6, 2023

PowerApps to PowerAutomate Integration - Connections!!

 When we integrate Power Automate flow with a PowerApp, by default the connections configured (run by user's) at powerapps will be passed on to Flow. 

For example, if we send email through Flow and its configured using service account, but when  the flow triggered from PowerApp, it passes the App running user's connection and email would be going from the user's account, not service account.  Similar thing would happen for other connections too.

There might be cases where we don't want this and the solution we follow in general is create a child flow and pass params to it from the main flow. Child flow uses configured connections as no connections are passed on to child flow.

But now, we do have much easier solution to this problem. It is with PowerApps V2 trigger. 

Using this new trigger, we get the ability to Impersonate actions / run activities with different user from Power Apps.

Once a flow is configured using new trigger, on the detail page, to the left bottom we would see "Run only Users" section. Click on Edit

This will provide option to update the connections to use for each type of connected we configured. By default they are set to "run-only user". We can change it to the connections we have in the flow.  


With this, for above example all emails triggered would be from service account only. We can repurpose this for other type of connections too like inserting data to SharePoint / read data from SharePoint even though end user doesn't have access on it.


Wednesday, January 4, 2023

Sharepoint Online Migration Considerations!

 Below are some of aspects to consider when we migrate a Sharepoint on Prem to Online. 

  • Checked out versions of the files won't migrate. Last checked in version will move during migration
  • If the file doesn't have any checked in version, it won't migrate. Need to consider this for files count match after migration
  • For files with no checked in version, we can check in using admin account by following "Go to the Document Library Settings and click on "Manage files which have no checked in version". You can manage the checked out files here to force check out it to yourself, then check it in."
  • Alerts wont be migrated, need to reconfigure them online
  • Personal Views / Personalized page customizations won't migrate, except the ones created using the migrating account, if any
  • Item versions would cause issue during migration if there is any change in required fields, like we have 100 records with no title, but later title made required . In this case, we need to remove required setting on fields, migrate content and then enable required fields
  • In online, we have only 2 templates and during migration all templates would be converted to any of these. But, we may loose some inbuilt features of the templates like Blogs
  • Any Page customizations / custom layouts may be set to default ones after migration. We need to rearrange them
  • Lists with huge content (more than 5k records) and views with many fields (containing 12+ lookup columns) would cause threshold errors. Need to update views & filters to look into the content 
  • Sharepoint links in general auto updated to point to new site, during this process if the url crosses 255 characters, it gives error. Need to fix them 

Wednesday, August 24, 2022

Powerapps form - Control field visibility using Sharepoint Groups

We in general create Sharepoint groups for any specific roles in a process and utilize them across the process for visibility / notifications etc.  As there is no direct way to check is a user is member of any specific Sharepoint group, we can follow below approach. 

1. Create a Sharepoint group and add required users for access. 

2. Create a Sharepoint List - PowerAppsAdmin and add Description column, along with existing Title

3. Add an Item to this list, 

      Title: "Custom App Admin Access" (Any relative name for easy reference)

      Description: Used in Powerapps form for Admin access fields (some details to understand easily on there its used)

4. Now remove  permissions on this list item and provide read access only to the above created sharepoint group, along with Owners group, if they are super admins.

5. In the PowerApps form, Add another data source  - above created Sharepoint List "PowerAppsAdmin"

Now the list and the data is accessible across the PowerApps. We can use this to control access or d isplay mode of fields / data cards using filter expressions, as in below example

6. Select Visible Property of a data card and write in below expression

not(IsEmpty(Filter(PowerAppsAdmin, Title = "Custom App Admin Access")))

The above expresssion is fitlering on the Admin lsit for an item with title we provided. If it is not empty, that means the logged in user has access to the list item and it implies the owner is an admin. So, the card will be visible to the user.

7. Same way, we can also control DisplayMode of the form be selecting Display Mode of the card and writing below expression

If(IsEmpty(Filter(PowerAppsAdmin, Title = "Custom App Admin Access")),DisplayMode.View,Parent.DisplayMode)

The above expression ensures if no record fetched, its always in view mode and for admins, the mode of field depends on form.


Wednesday, April 20, 2022

Azure Function to Update DLP Policy of a Sharepoint Site

In order to share an Online Sharepoint site with external users at restricted level, we can setup different Data loss Prevention (DLP) policies and include / exclude the specific Site in the policy. 

In this article, will walk through automate the process of  updating DLP policies of a Sharepoint site using Azure Function which can be referred from a Microsoft Flow or any external client like Service NOW. 

For DLP policy updates, we use Exchange Online Management module in Powershell. The only way to connect to exchange online / IPPS session is  using User account. So, we create an admin account in azure with MFA disabled (  Use Conditional Access to exclude ) and provide "Compliance Administrator" role.

Login to portal.azure.com and access Function App.  


Click on Create on top left. Select an existing Subscription. You may create a new Resource Group or choose from an existing ( this is used to group multiple resources together ). Provide Function App name, choose Powershell 7.0 as runtime stack and Click on Review + create. 

It may take a while to deploy. Once its ready, access Configuration on left nav of the app to store username and Password of admin account. Best practice is to refer from Key Vault to keep them secure.

Access, functions on left nav, Create new function.

Choose, HTTP trigger template for the function. We will be able to call this service from Flow or any external client.

After Creation of function, fetch the URL using "Get Function URL" available in top nav. This will be the API url to consume from external systems. If we want to secure it further, can configure in API Management tool.

As we need Exchange Online Management Module, we can save the module to local machine and upload to the Azure function using FTP.  Once its available in server, use Import-module by referring it from server location. 

Now we should be able to write the code in browser by clicking on Code + Test on left navigation.

using namespace System.Net
# Input bindings are passed in via param block.
param($Request$TriggerMetadata)
# Write to the Azure Functions log stream.
Write-Host "PowerShell HTTP trigger function processed a request."

# Interact with the body of the request.
$inputSite = $Request.Body.sharepointSite
$accessType = $Request.Body.accessType
#sample set
#$inputSite = "https://luckyenv.sharepoint.com/sites/SampleSite"
#$accessType = "Site Level"

#admin center access is used to check if provided site exists in the tenant
$AdminCenterURL = "https://luckyenv-admin.sharepoint.com/"

Write-Host "provided site is $inputSite"
try {
    #make sure this account has MFA disabled to work in azure functions automated way.
    $user = $env:admin-username
    $pw = $env:admin-password | ConvertTo-SecureString -AsPlainText

    $cred = New-Object -TypeName System.Management.Automation.PSCredential -argumentlist $user$pw
    Write-Host "creds created."

    #connect to sharepoint tenant to validate site url
    Connect-PnPOnline -URL $AdminCenterURL -Credential $cred
    #Check if site exists
    $Site = Get-PnPTenantSite | Where { $_.Url -eq $inputSite }
    If ($Site -ne $null) {
        #disconnect from tenant
        Disconnect-PnPOnline
        try {
            # we need to import the 
            Import-Module "D:\Home\site\wwwroot\updatedlppolicy\modules\ExchangeOnlineManagement\2.0.5\ExchangeOnlineManagement.psd1"
            #Import-Module ExchangeOnlineManagement
    
            #Connect to the session
            Connect-IPPSSession -Credential $cred
            Write-Host "dlp policy session connected."
    
            #Exclude the site from default policy
            Set-DlpCompliancePolicy "Sharing Outside of Org" -AddSharePointLocationException $inputSite -ErrorAction Stop
            Write-Host "Site excluded from default policy"
    
            #We have 2 policies based on Access type pased to API
            if ( $accessType -eq "Site Level") {
                $dlpPolicy = "External Collaboration Entire Site"
            }
            else {
                $dlpPolicy = "External COllaboration Subset"
            }
            #Include the site to a specific policy
            Set-DlpCompliancePolicy $dlpPolicy  -AddSharePointLocation $inputSite -ErrorAction Stop
            Write-Host "dlp policies updated."
    
            #Disconnect ipps session. we need to disconnect, limited sessions allowed at a time
            Disconnect-ExchangeOnline -Confirm:$false -InformationAction Ignore -ErrorAction SilentlyContinue
    
            #Prepare response 
            $status = "Success"
            $body = "successfully updated the DLP policy."

        }
        catch {
            Write-host "Error caught and handled in catch."
            Write-Error $_
            Write-Error $_.ScriptStackTrace

            #Prepare response 
            $status = "Failed"
            $body = "An error occurred that could not be resolved. $_.Exception.Message"
    
            #Disconnect ipps session.
            Disconnect-ExchangeOnline -Confirm:$false -InformationAction Ignore -ErrorAction SilentlyContinue
    
        }
    }
    Else {
        #Prepare response 
        $status = "Failed"
        $body = "Provided Sharepoint site doesn't exist in the tenant."
        Disconnect-PnPOnline
    }
}
catch {
    Write-host "Error caught on high level and handled in catch."
    Write-Error $_
    Write-Error $_.ScriptStackTrace
    
    #Prepare response 
    $status = "Failed"
    $body = "An error occurred in connecting to system and could not be resolved. $_.Exception.Message"

    #Disconnect from tenant, if connected
    Disconnect-PnPOnline
    
}
# Associate values to output bindings by calling 'Push-OutputBinding'.
Push-OutputBinding -Name Response -Value ([HttpResponseContext]@{
        StatusCode = [HttpStatusCode]::OK
        Body       = @{Status = $statusMessage = $body } | ConvertTo-Json -Compress
    })


Updated comments for each line of the code to understand it in detail. In this API, we are passing 2 parameters, one is site url and other is access type, could be at site level / doc level. Based on Access type, we choose the DLP policy of the site to be updated to.

Happy coding :-)

Wednesday, April 7, 2021

PowerApps - Append Text Enabled field Functionality on Sharepoint

In Sharepoint,  we do have "Append Changes to Existing Text" functionality on Mutli text fields. We use this for common requirements like, comments, Audit history logs of the list item / document in a library.  

If we use PowerApps to customize the default form, sad part is, PowerApps doesn't have the capability to display history content of the field. 

Below is the User voice on it and its under review by Microsoft Team.

https://powerusers.microsoft.com/t5/Power-Apps-Ideas/Append-comments-Field/idi-p/35306

We have couple of alternate solutions for this functionality, a few as below,

  1. Separate list to store comments and display them in powerapps form by querying them related to the list item
  2. Use Flow to query comments from list history and display the response content on PowerApps form
  3. Maintain another field in the list to store history of the field content changes and display it on the form.

If the list / process is a new one, I would suggest to go with Approach 3 for now, as its easier to configure and also once the functionality available, we can remove this field from list and form.

Below are the steps to implement it.

Step 1. Create the Multiline text field “Comments” with Plain text enabled, and enable “Append Changes to existing text”, (this is not needed now, but in future, once Powerapps brings the functionality, we can make use of it)


Step 2: Create another Multiline text field, “Comments_History” with rich text enabled.


Step 3: Add comments field in PowerApps form and set visible property to Not(SharePointForm1.Mode = FormMode.View) (Hide this field on view form, as content would be in history field)


Step 4: Add Comments History Field in form and

               4.a: Remove the text field inside data card

               4.b: Insert “HTML Text” from the ribbon and set HTMLText property to Parent.Default


               4.c: we would see 2 errors, one is Update property, clear the formula of it

               4.d: Other error is Y property of card, in formula, replace DatacardX with HtmlText1 I, it would resolve

               4.e: Also, for Visible property of data card, set Not(IsBlank(ThisItem.Comments_History)) (We hide this field, when no content in it)


Step 5: Publish the form


Now, we need to have logic to save content from Comments field to the History field. 

Here we can use Patch method from PowerApps or, if we have a Flow functionality on the list, we can write logic in it.  Here, I used Flow, as in below 


Step 6: Now, create a new flow / open existing flow associated to this list, it should trigger on New and Update


Step 7: Add logic to check if comments field is empty or not and if not, build HTML content for Comments history by appending to existing content in History field and update current item


Finally, upon adding item, in the form, it would appear as in below.


Monday, December 7, 2020

Power Automate - Sharepoint access considerations

When we use sharepoint related actions on Power Automate, we may come across any of the below situations. 

1. Lists / libraries with more than 12 complex columns like people picker / lookup / choice etc cant be queried in one go. Could be in a trigger / action like get item or Update item too.

Need to create a View by limiting the number of columns required for our execution and use it in these actions.  We can also use HTTP rest APIs.

2. If flow trigger is on item / file properties update and we have action to update current item, this may become infinite loop as the update item in flow logic would trigger another instance of flow.

We need to use trigger conditions to restrict flow execution. We may go by some logic for status column or so. Or, can create a dedicated account for flows and filter by editor field with this account Or, can create a datetime, FlowRunDate and use it while updating on flow and use this in trigger condition. 

@not(contains(triggerBody()['Editor']?['DisplayName'],'<<account name>>'))

@or(empty(triggerBody()?['FlowRunDate']),not(lessOrEquals(ticks(triggerBody()?['Modified']),ticks(addSeconds(triggerBody()?['FlowRunDate'],60)))))


3. Update / set Hyperlink column, no option to set description.

4. Using date / datetime fields in filters is different as below

DateField eq '2020-07-23'

DateTimeField le '2020-07-23T23:59:59Z' and DateTimeField ge '2020-07-23T00:00:00Z'


5. Columns created in a list, but not added to any content type cant be fetched directly through trigger.


Create a view with all the required columns and refer it in the trigger action.


Thursday, December 3, 2020

Sharepoint Online - Set a user as SCA using Rest API

In order to set a user / Security group as a Site Collection administrator, we can use Rest API. 

Below is the Post call, with request body details
 //Rest URI  
 _api/web/siteusers  
 //headers  
 {  
   "Accept": "application/json; odata=verbose",  
   "content-type": "application/json; odata=verbose"  
 }  
 //Body  
 { "__metadata": { "type": "SP.User"},  
  "LoginName": "<<Login Name>>",  
  "IsSiteAdmin":"true"  
 }  
we are actually setting the IsSiteAdmin flag to true, if we want to remove SCA, we can set it to false.

Note: If the site already has this user, it will update the existing user

Tuesday, August 11, 2020

Microsoft Flows Approvals with Reminders functionality!

The default approvals provided through Microsoft Flows doesn't have reminders capability. We do have lots of alternate custom approaches to send reminder emails on our own. In this article will go through a custom approach which has below functionalities

  • Reminders to the participants who haven't responded - Crucial, as we don't want to confuse users with reminders who already responded to it.
  • Reminders with Respond Link
  • Reminders with the default Adaptive card through Teams

We can extend this approach for approvals when it crossed 30 days too. 

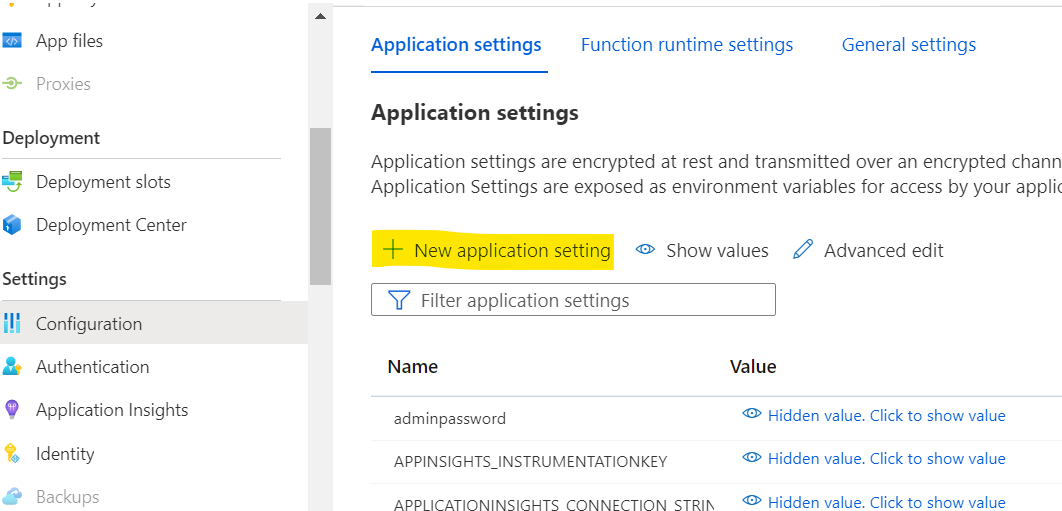
To identify who already responded to the approval, we are accessing Common Data Service entities. So, we need the Premium connector for CDS actions. Also, the account we use (admin account) should have full access to the CDS Approval entities.

Approach in below steps

Initialize Variable - to hold Pending Assignees list, used later.

Create an Approval - with custom response options for Approve and Reject as i want all responses from participants.

Then, created a parallel branch for Approvals and reminders.

Wait for an Approval- this action is to hold till approval is complete and perform actions based on output

Email notification- to notify users about completion

Terminate process - As we have it as parallel action, once approval actions are complete, we don't want the other branch (reminder) to run.

On the other parallel branch, Reminder functionality

Delay - used delay action to hold for 3 minutes, we can configure delay until too.

List records - CDS action to list Approval Requests sent for above created approval id. we already know this info, but we need IDs of users as stored in CDS entities.

Select - as the response would have lots of meta data, we just need OwningUserID, using this action we pull required property of all requests. item()?['msdyn_flow_approvalrequestidx_owninguserid']

List records - this action is to list records from Approval Responses entities with the approval id created in start.

Select - to extract OwningUserIDs of all responses received so far.

Filter - Now, we filter users from requests, by excluding responded users. As these are simple arrays, filter action would do, From is 'Select requests', Left of filter is 'Select responses' and to the right is item()

Now we have list of user ids who haven't responded yet. But we need email ids of these users. Below logic is to fetch email ids.

Apply to each - loop through each user from Filter action output array

Get Record - to get user details using the user id

Append to string - we extract user email from above action and append it to the variable created to hold pending approvals

Post your own adaptive card - we send the adaptive card available through create an approval on top to use email id.

This would send the adaptive card to all pending participants through the teams and they can respond directly as in email.

And, as we also have all email ids in the string variable, we use it to send reminder email with Approval link.

All the actions put together, the flow would be as below.